Rank Expert Dialog Box
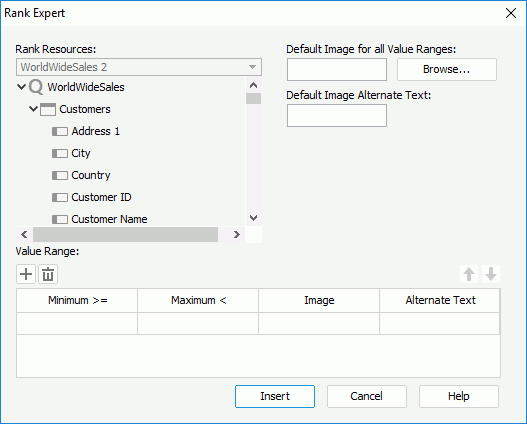
You can use the Rank Expert dialog box to insert a rank into a report. This topic describes the options in the dialog box.
Designer displays the Rank Expert dialog box when you navigate to Insert > Rank, or drag the Rank icon ![]() from the Components panel to a query-based page report.
from the Components panel to a query-based page report.

Designer displays these options:
Rank Resources
This drop-down list displays the dataset available for the current insertion of the rank, and the list box below shows its fields, including DBFields, formulas, summaries, and parameters. Select the field you want to insert as rank from the list box.
Default Image for all Value Ranges
Specify the default image for all value ranges, which Designer applies when the value of a field does not fall into any of the defined ranges. You can select Browse to specify the image path or type the path and file name of the image in the text box.
Default Image Alternate Text
Specify the text you want to show instead when the default image cannot display.
Value Range
You can specify the value ranges for the rank in this box.
-
 Add button
Select to add a new value range. -
 Remove button
Select to delete the specified value range. -
 Move Up button
Select to move the specified value range higher in the list. -
 Move Down button
Select to move the specified value range lower in the list. - Minimum (>=)
This column shows the minimum values that you specify for the ranges. - Maximum (<)
This column shows the maximum values that you specify for the ranges. - Image
This column shows the images that you specify for the value ranges, which display when the field's values fall into the ranges. - Alternate Text
This column shows the alternate text that you specify for the images of the value ranges, which shows when the images cannot display.
Insert
Select to accept the settings and insert the rank into the report.
Cancel
Select to close the dialog box without saving any changes.
Help
Select to view information about the dialog box.
 Previous Topic
 Back to top