Specifying Parameter Values
When you preview, print or, export a report with parameters, or preview a query that contains parameters, Designer displays the Enter Parameter Values dialog box for you to specify values of the parameters, which lists all the parameters the report or query applies with their prompting information. This topic describes how you can specify values for parameters of different types and customize the display order of the parameters in the Enter Parameter Values dialog box.
This topic contains the following sections:
- General Methods for Specifying Parameter Values
- Specifying Multiple Values for a Parameter
- Setting Values for Date/Time/DateTime Parameters
- Customizing the Display Order of Parameters
General Methods for Specifying Parameter Values
The method to specify a parameter value varies with the type and properties of the parameter. The following shows the general methods you can use to specify parameter values.
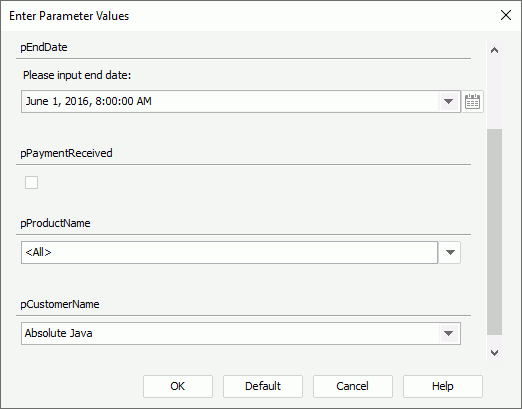
- Type the value manually in the parameter value text box if the parameter allows for type-in values but not multiple values.
- Select or clear the checkbox to specify a Yes/No value.
- Select the calendar
 to specify a date and time value.
 - Select
 and specify multiple values if the parameter allows for multiple values.
 - Select
 and then select the required value from the drop-down list. When a parameter's Encrypt Parameter Value property is "true", Designer disables the value drop-down list by default, in which case, if the Hide Parameter Value checkbox is available, you can clear it to enable the drop-down list.
You can use the icons on the top of the value drop-down list to locate the value you need.
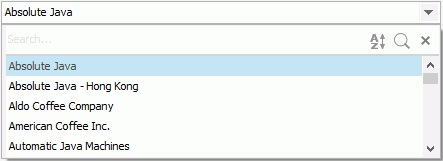
- To sort the values in the ascending or descending order for easy look-up, select the Sort icon
 , then select the corresponding option from the drop-down menu. The default order is "No Sort", which means the values are listed as how you add them if the parameter is a type-in parameter, or based on their original order in the database if the parameter is bound with a column. The change of sort order is a one-off action that Designer does not save after you exit the dialog box, meaning, each time when you open the dialog box, Designer always applies No Sort to the values.
 - To search for a value, select the Search icon
 . In the search box that appears, type the text you want to search for and Designer lists the values containing the matched text.
  Drop-down icon
Select to list more search options.- Highlight All
Select to highlight all the matched text. - Match Case
Select to search for text that meets the case of the text you type. - Match Whole Word
Select to search for text that looks the same as the text you type.
- Highlight All
 Delete icon
Select to close the search box and cancel the search.- To close the value drop-down list, select the Close icon
 .
.
You can use the following options in the search box:
For performance concern, Designer lists at most 500 values in the drop-down list. When the listed values are just a part of the values of the parameter, after scrolling down to the bottom of the list, you can select More at the end to load more values (500 at most) into the drop-down list.
- To sort the values in the ascending or descending order for easy look-up, select the Sort icon
![]() You should not use blank as the thousands separator in parameter values of the Number type under French locale; otherwise, Report Engine cannot correctly recognize your input due to a JVM bug. For more information, go to bugs.sun.com/view_bug.do;jsessionid=c8cdaf911b20fffffffffd9fc6340b30d670?bug_id=4510618.
You should not use blank as the thousands separator in parameter values of the Number type under French locale; otherwise, Report Engine cannot correctly recognize your input due to a JVM bug. For more information, go to bugs.sun.com/view_bug.do;jsessionid=c8cdaf911b20fffffffffd9fc6340b30d670?bug_id=4510618.
Specifying Multiple Values for a Parameter
For a parameter that allows for multiple values (the parameter's Allow Multiple Values property is "true"), you can specify one or more values to it.
- Select
 next to the value text box of the parameter. Designer displays the Enter Values dialog box.
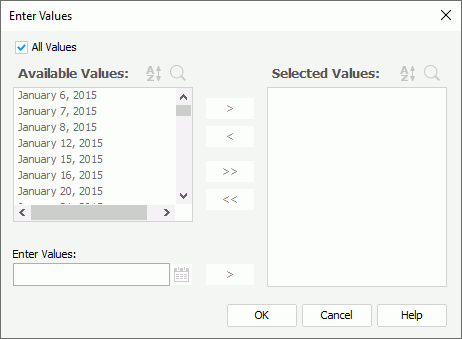
- If the Enable the "All Values" Option property of the parameter is "true", the All Values checkbox is available and selected by default. It means to apply all values to the parameter, which can be all values of the parameter determined by Report, all values in the database, or all the available values according to the Scope of All Values setting of the parameter. When you insert the parameter as a field into a report and select All Values as the value, the field shows the string "All" in the report. If you do not want to apply all values to the parameter, clear All Values and then specify the values as shown in the following steps.
- Select the required values in the Available Values box and select Add
 to add them to the Selected Values box; to add all the available values, select Add All
  . If some added values are not wanted, select them in the Selected Values box and select Remove
  to remove them; to remove all added values, select Remove All
  .
.  For performance concern, Designer lists at most 500 values in the Available Values box. When the listed values are just a part of the values of the parameter, after scrolling down to the bottom of the list, you can select the down arrow appearing at the end to load more values (500 at most) into the list.
 - When the parameter's Allow Type-in of Value property is "true", the Enter Values text box is available. You can type a value manually and select Add
 next to the text box to add it to the Selected Values box. If the parameter is bound with a column, but the display column is different from the bound column, make sure the value you specify is that of the bound column. When the parameter is Date, Time, or DateTime data type, you can also select the calendar
  to specify a date and time value.
- Select OK to select the specified values for the parameter.
Setting Values for Date/Time/DateTime Parameters
When specifying value for a parameter of the Date, Time, or DateTime type which allows for type-in values (the parameter's Allow Type-in of Value property is "true"), you can use the calendar widget to select a date and time as the value, or customize a dynamic date and time value by creating an expression using Report's built-in Date/Time functions. By using an expression, the defaults are always the dates you want to use. For example, you might want the start date to always be 7 days ago and the end date to be today, you can then customize the value for the start date parameter as dateadd('d', -7, today()) and today() for the end date parameter. The expression has higher priority than the value specified using the calendar.
To select a date and time value from the calendar
- Select the calendar
 for the parameter. Designer displays the following dialog box.
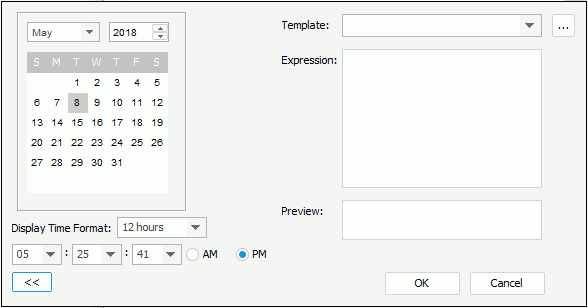
- In the calendar on the left, specify the month, year, and day accordingly.
- When the parameter is DateTime data type, Designer displays the time settings. From the Display Time Format drop-down list, specify the format to display the time, 12 hours or 24 hours (each time when you open the calendar widget, the default selected format is always 12 hours), then select the hour, minute, and second from the corresponding drop-down lists and choose whether it is AM or PM.
- Select OK. Designer adds the value in the parameter's value text box in the Enter Parameter Values dialog box.
To customize a dynamic date and time value by creating an expression
- Select the calendar
 for the parameter. Designer displays the following dialog box (if the right section of the dialog box is not available, select
  on the bottom left corner to expand it).

- The Template drop-down list provides some predefined expressions. You can customize your own expression either based on an existing template or by directly editing the content in the Expression text box.
- Use Report's built-in Date/Time functions in the expression. To display the functions, select the ellipsis
 next to the Template drop-down list, Designer then displays the Expression dialog box.
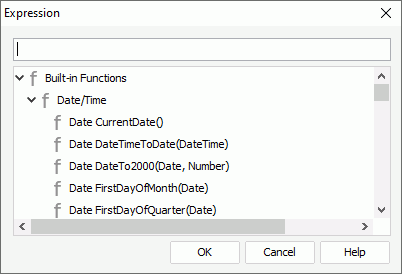
- The top text box in the Expression dialog box shows the current expression statement if there is. Put the cursor where you want to insert the function in the statement, then double-click the required function to insert it there. Select OK to close the dialog box.
- The Preview box calculates the result of the current expression. Each time you modify the expression, Designer refreshes the result in the box. Designer can also synchronizes the date/time in the calendar on the right with the date/time calculated from a valid expression. When an expression is invalid, Designer displays an error message in the Preview box and makes no change to the calendar and remains the currently selected date/time in the calendar.
- Select OK. Designer adds the value calculated by the expression in the parameter's value text box in the Enter Parameter Values dialog box.
Customizing the Display Order of Parameters
By default, Designer lists the parameters in ascending alphabetic order in the Enter Parameter Values dialog box, thus the parameter "pEndDate" appears before "pStartDate" which would be very confusing to users. Designer enables you to customize the order of the parameters in the dialog box so that they can display in a more reasonable sequence. The order does not affect the display sequence of the parameters in the resource tree, which is determined by the Sort setting in the Options dialog box.
You can customize the parameter display order at two levels: catalog and specific report. When you specify the order of parameters in a catalog, Designer applies the order to all reports using the catalog. If you define the order at both levels, the report level order has higher priority than the catalog level one.
To adjust the parameter order for a catalog
- Open the catalog containing parameters for which you would like to adjust the order.
- In the Catalog Manager, expand a data source, select the Parameters node or any parameter in the node, then select Parameter Order on the Catalog Manager toolbar. Designer displays the Parameter Order dialog box.
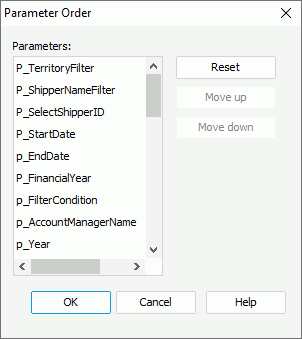
- Select a parameter and select Move Up or Move Down to adjust the order of the parameters, or simply drag the parameters in the Parameters box. When a catalog contains a lot of parameters, it might be much easier by dragging and dropping.
- Select OK to accept the changes.
To adjust the parameter order for a specific report
- Open the report containing parameters for which you would like to adjust the order.
- Navigate to Report > Parameter Order. Designer displays the Parameter Order dialog box, which contains only the parameters the report applies.
- Select a parameter and select Move Up or Move Down to adjust the order of the parameters, or simply drag the parameters in the Parameters box.
- Select OK to apply the order.
 Previous Topic
 Back to top