Working with XSD Styles
An XSD style, that is a style group in a catalog, can hold a large amount of predefined object properties, giving you more control over the appearance and presentation of your report. You can nest the style groups, where the parent group is used as a container of other groups. The Style Group feature makes it easy to save and apply styles without repeatedly designing them each time. You can create various visual presentation sets from a single report, and change the visual presentation of your report at runtime in a dramatic way by applying different style groups. This topic describes how you can create and modify XSD styles in Designer, and edit the XSD style files outside Designer.
![]() XSD styles are a Report specific format, so you may want to use CSS styles which are an industry standard.
XSD styles are a Report specific format, so you may want to use CSS styles which are an industry standard.
This topic contains the following sections:
Creating and Modifying XSD Styles in a Catalog
Designer provides you with the Style Editor to manage XSD styles in a catalog (to display the editor, open the catalog to which you want to add the style groups, then on the Catalog Manager toolbar, select Style).
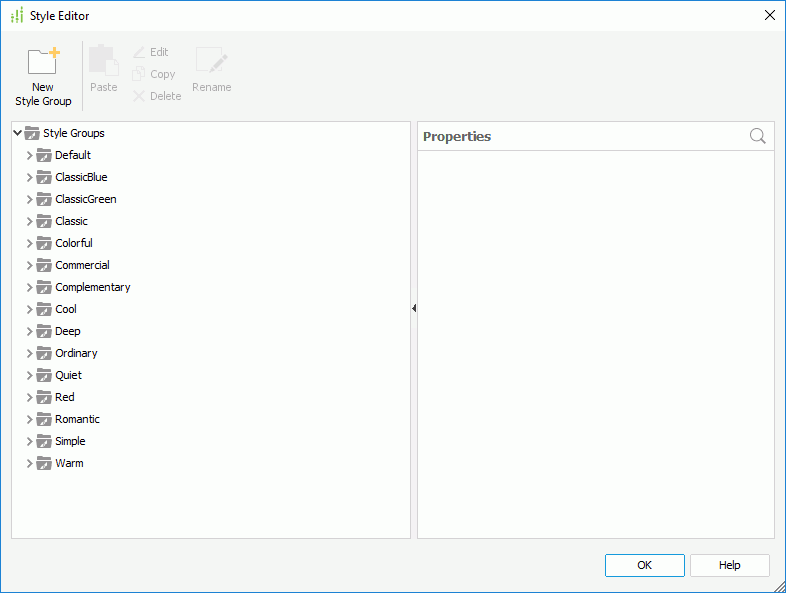
The following are some tips for you when working in the Style Editor.
- The root of the style group tree can only hold style groups. The styles must reside in the style groups. You cannot create a style directly in the style group tree root.
- You cannot create style groups in the Default style group.
- The name of each style group must be unique in the style group tree.
- You can create more than one style for a style type, and apply different styles to report objects of the same type. For example, suppose that you have a number of DBFields in your report, such as address fields, totals, and quantity fields. You probably do not want all the fields to look the same. You can create two or more styles, using the same style type - DBField, and then apply them separately to the fields that you want to distinguish.
- You can apply a default style to all the objects that hold the same type.
In the Default style group, create a new style, making sure that the style name and style type are the same, for example, style name is Label and style type is Label. Then, modify the style properties. When you insert a new object of the specified type into a report, Designer applies the default style to the object automatically. You can see the difference only at runtime.
Creating an XSD Style
- Do either of the following:
- Right-click any of the existing style groups (except the Default style group) or the root node Style Groups and select New Style Group from the shortcut menu.
- Select the root node Style Groups, select New Style Group on the toolbar.
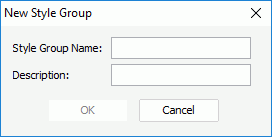
- Specify the name and description of the group, then select OK. Designer adds a new style group to the tree.
- Right-click the group and select New Style, or select the group and select New Style on the toolbar. Designer displays the New Style dialog box.
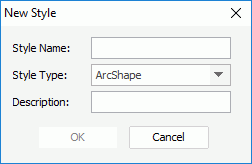
- Specify the name, type, and description of the new style, then select OK. The style type indicates the application scope of a style, for example, you can apply a style of the "Label" type to label objects, and a style of the "DBField" type to DBFields.
- In the Save Style dialog box, add the properties you want to include in the style and change the property values as required.
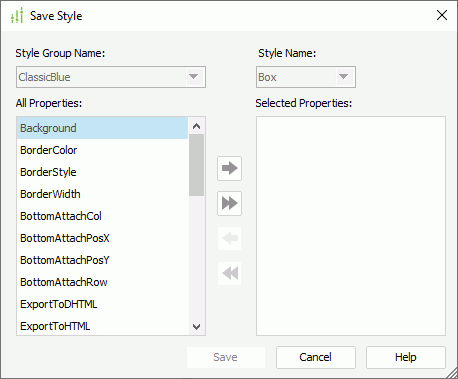
- To add a property, select it in the All Properties box and select Add
 ; to add all the available properties to the style at a time, select Add All
  . Designer displays different properties in the All Properties box for different style types.
 - To edit the value of a property, select its value cell in the Selected Properties box, then type the new value and select Enter on the keyboard to confirm the change.
- To remove a property that you have added, select it in the Selected Properties box and select Remove
 ; to remove all the added properties at a time, select Remove All
  .
.
- To add a property, select it in the All Properties box and select Add
- Select Save to add the style to the style group.
- Repeat steps 3 to 6 to add more styles to the style group.
Duplicating an XSD Style
You can duplicate an XSD style using either of the following methods:
- Right-click the style group and select Copy Style Group from the shortcut menu, then right-click the node where you want to duplicate the style group, and select Paste Style Group.
- Select the style group and select Copy on the Style Editor toolbar, then select the node to place the style group and select Paste on the toolbar.
Editing an XSD Style
- Right-click the style group and select Edit Group from the shortcut menu, or select the style group and select Edit on the Style Editor toolbar. Designer displays the Edit Style Group dialog box.
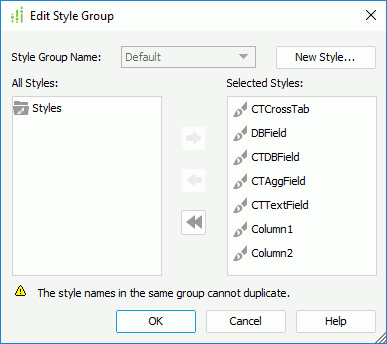
- In the All Styles box, select the styles that you want to include in the group, and then select Add
 to add them to the Selected Styles box; or you can remove some existing styles from the group by selecting them in the Selected Styles box and selecting Remove
  .
. - If you want to add a new style in the group, select New Style to create the style.
- Select OK to finish editing.
Renaming an XSD Style
You can rename the style groups except for the Default style group.
- Do one of the following:
- Select the style group and select Rename on the Style Editor toolbar.
- Right-click the style group and select Rename from the shortcut menu.
- Select on the name of the style group twice.
- The name box becomes editable. Type the new name and select outside the name box to accept the change.
Editing the Properties of an XSD Style or a Style in an XSD Style
Select the style group, or expand a style group and select the style in it, then in the Properties sheet on the right, edit the property values as required.
You can use the search box to search for the properties you need (to display the search box, select the Search icon  at the upper right corner of the Properties sheet). To start searching, type the text you want to search for in the search box and Designer lists the properties containing the matched text. Designer closes the search box when you select another style group or style.
You can use the following options in the search box:
-
 Drop-down icon
Select to list more search options.- Highlight All
Select to highlight all the matched text. - Match Case
Select to search for text that meets the case of the text you type. - Match Whole Word
Select to search for text that looks the same as the text you type.
- Highlight All
-
 Delete icon
Select to close the search box and cancel the search.
Editing a Style in an XSD Style
- Expand the node of the style group, select the style in it, then select Edit on the Style Editor toolbar or right-click the style and select Edit Style from the shortcut menu.
- In the Save Style dialog box, add more properties to the style or edit the existing properties of the style.
- Select OK to apply the changes.
Renaming a Style in an XSD Style
- Expand the node of the style group, then do one of the following:
- Select the style and select Rename on the Style Editor toolbar.
- Right-click the style and select Rename from the shortcut menu.
- Select on the name of the style twice.
- The name box becomes editable. Type the new name and select outside the name box to accept the change.
Removing a Style from an XSD Style
- Expand the node of the style group, then do one of the following:
- Select the style and select Delete on the Style Editor toolbar.
- Right-click the style and select Delete from the shortcut menu.
- Select the style and select Delete on the keyboard.
- Select OK in the warning message to confirm the removal.
Removing an XSD Style from a Catalog
Except for the Default style group, you can delete the other style groups from the current catalog if you do not need them any more.
- Do one of the following:
- Select the style group and select Delete on the Style Editor toolbar.
- Right-click the style group and select Delete from the shortcut menu.
- Select the style group and select Delete on your keyboard.
- Select OK in the warning message to confirm the removal.
Editing the XSD Style Files Outside Designer
In addition to editing the styles (style groups) in the Style Editor of Designer, you can also edit the XSD format styles (style groups) outside Designer.
When you save a catalog, Designer saves the style information to disk at the same time. Designer stores the related files as follows:
| File Name | File Description | Location |
|---|---|---|
| CatalogName_stl.xml | Style Group Structure in the Catalog | Catalog Folder (The directory where the catalog resides) |
| StyleGroupName_stl.xsd | Group/Style information | <install_root>\style
|
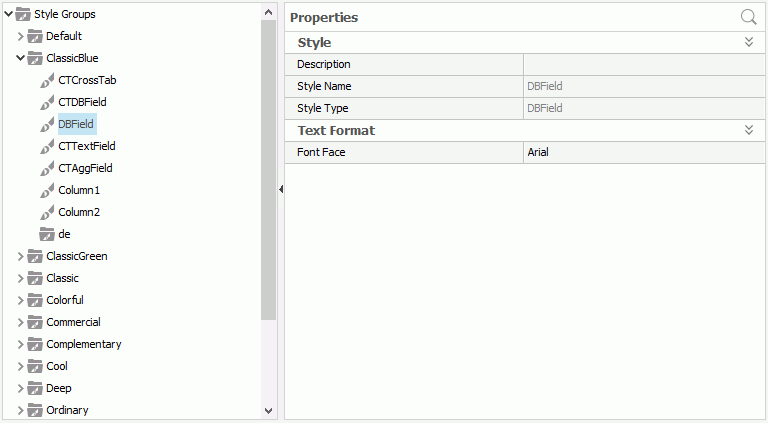
The file CatalogName_stl.xml keeps the style group structure information. The following shows an example.
| Style Group Structure in the Catalog Manager | Corresponding Information in SampleReports_stl.xml |
|---|---|
|
<?xml version="1.0" encoding="UTF-8"?>
|
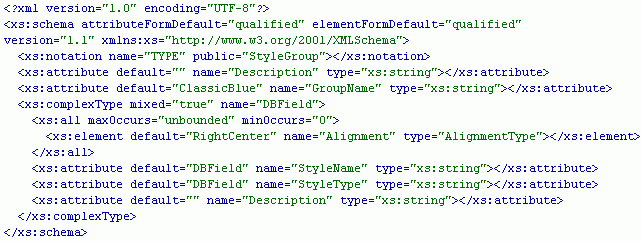
The file StyleGroupName_stl.xsd keeps the group/style information, which in the preceding sample is:
| File Content of ClassicBlue_stl.xsd |
|---|
|
As you can see in the preceding code sample, an XML style group file contains style group information, style information, and the style property entry information. You can edit the attributes of an element.
- To add a style entry, copy and paste the style information section, and then modify the attributes.
- To add a style property entry, copy and paste any element line, and then modify the attributes.
- To delete a style entry or style property entry, select the corresponding section, and delete it.
- To add a new style group, take the following steps:
- Copy and paste an existing XML style group file.
- Rename it using the required name (Format: GroupName _stl.xsd).
- Change the default attribute in the GroupName element line using the required group name. Make sure that the name is the same as the group name specified in the XML style group file name.
- Add a new line for this group in CatalogName_stl.xml. For example, if the new group name is GroupA, you would then insert the following line to the file:
<StyleGroup name="GroupA"></StyleGroup> - Modify the XML style group file (GroupName_stl.xsd).
- Open the catalog in Designer and you can see the changes.
![]()
- The value you type for the default attribute must be consistent with other attributes in the element, and is recognized by Designer.
For example, if you want to change the Font Face property, you must type a proper font name that Report supports for the default attribute, such as Arial, Times New Roman, and Tahoma. You cannot type strings that Report cannot recognize; otherwise, the element cannot take effect at runtime.
- Make sure that the GroupName attribute is consistent with the XML style group file name.
For example, with GroupA in the XML file, the GroupName attribute is:
<xs:attribute name="GroupName" type="xs:string" default="GroupA"></xs:attribute>The XML style group file name should then be GroupA_stl.xsd.
 Previous Topic
 Back to top