Creating and Using Dynamic Connections
Administrators can modify the original catalog connection properties, and then save the modified properties as a dynamic connection. This topic describes how you can create, manage, and apply dynamic connections on Report Server.
For a dynamic connection, you can define a database user mapping table to contain these columns: SID, database user, and database password. Then when a user runs a report, if there are dynamic connections available to the SID, the user can select a dynamic connection to apply. Report Server manages dynamic connections in the server system database.
Server categorizes dynamic connections at the organization level. If the system administrator creates a dynamic connection, the connection is available to users that are not from any organizations. If an organization administrator creates a dynamic connection, the connection is available to users in the organization. When you define a dynamic connection in an organization, all users/groups/roles must be from the same organization. When you define a connection outside of all organizations, all users/groups/roles must be from outside of all organizations. System administrator can define, view, and edit all the dynamic connections.
Developers can also call API methods for using dynamic connections.
This topic contains the following sections:
Creating Dynamic Connections
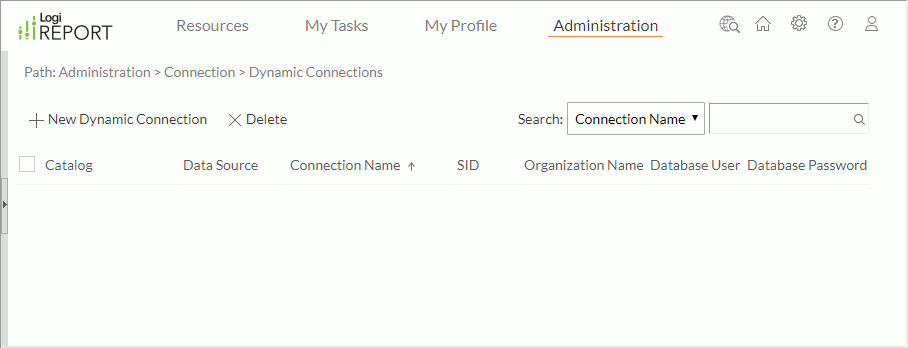
- On the system toolbar of the Server Console, navigate to Administration > Connection > Dynamic Connections. Server displays the Dynamic Connections page.

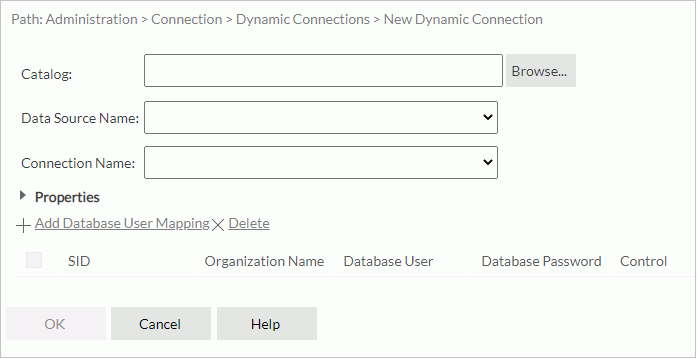
- Select New Dynamic Connection. Server displays the New Dynamic Connection dialog box.

- Select Browse. Server displays the Select Catalog dialog box.
- Select a catalog.
- Select OK.
- From the Data Source Name drop-down list, select a data source in the selected catalog.
- From the Connection Name drop-down list, select a connection that you want to use to connect to the data source.
- Select Properties. Server displays the properties of the selected connection.
- Initially Server clears all the properties, and you cannot edit them. To change a property's value, first select the property, then type a value in the Value text box or select a value from the drop-down list. You can select all the properties by selecting the top checkbox.
Whenever you clear a property, it always shows the original value even if you have changed the value.
See the connection properties in the table:
Property Name Description Date Format The default Date format corresponding to the database. The Report Date format follows that of Java. Description The description of the connection. Driver The class name of the JDBC driver such as oracle.jdbc.driver.OracleDriver. Is JNDI Data Source Select true if it is a JNDI data source, otherwise, select false. JNDI Data Source Name The JNDI data source name when Is JNDI Data Source is true. Name The name of the connection which, by default, is the connection URL, but can also be a user-friendly name for the connection. Name Pattern Select how you want to use the catalog or schema in data manipulation. - unqualified name - Select if you want to use neither catalog nor schema in data manipulation. Example:
SELECT t.c FROM t - 2-part names - Select if you want to use schema in data manipulation. Example:
SELECT schema.t.c FROM schema.t - 3-part names - Select if you want to use both catalog and schema in data manipulation. Example:
SELECT catalog.schema.t.c from catalog.schema.t
Read Only Select the mode you want to use to open the connection to the JDBC data source. - read & write - Select if you want to open the DBMS with updates enabled which requires more processing to ensure concurrency control.
- default - Select if you want to use the DBMS default setting specified by the DBMS Administrator.
- read only - Select if you want the driver to optimize performance for reporting which does not need to write to the DBMS.
Time Format The default time format corresponding to the database. Timestamp Format The default Timestamp format corresponding to the database. The Timestamp formats follow that of Java. Transaction Mode Select the transaction mode for the connection. - default - You cannot get the transaction information from JDBC connection.
- none - No transactions.
- read uncommitted - Dirty reads, non-repeatable reads, and phantom reads can occur. This mode speeds up the transaction of the catalog.
- read committed - No dirty reads. Non-repeatable reads and phantom reads can occur.
- repeatable read - No dirty reads or non-repeatable reads. Phantom reads can occur.
- serializable - No dirty reads, non-repeatable reads, or phantom reads.
URL The JDBC URL that establishes the connection to the database, for example, jdbc:oracle:thin:@localhost:1521:ORCL.User Defined Extra Characters Extra characters of user defined quote qualifier. User Defined Quote Character The quote character of user defined quote qualifier. Default Database User The username for connecting to the database, which the database DBA determines. Null means using the default database username. Default Database Password The password for connecting to the database, which the database DBA determines. Null means using the default database password. Database:[Name] A database name of the MongoDB connection. You may see more than one database. Select the arrow icon, and Server displays the collections in the database. You can update the names of databases and collections for MongoDB. - unqualified name - Select if you want to use neither catalog nor schema in data manipulation. Example:
- Select Add Database User Mapping. Server adds a row.
- You can define the mapping relationship between SID and database user/password in the row:
- Double-click in the Organization Name text box and then select an item from the drop-down list. The item System means that you can select users outside any organizations as SID.
- The SID drop-down list displays the users, roles, and groups in the selected organization. Select one as the security identifiers (SID).
- Double-click in the text box of Database User and type a username.
- Double-click in the text box of Database Password and type the password.
- Select Test Connection to test whether the username and password can connect to the database.
Within a dynamic connection, make sure that you map one SID to only one pair of database user and name.
- Select OK to create the dynamic connection.
Server adds the dynamic connection in the dynamic connection table, which consists of these columns:
| Column Name | Description |
|---|---|
| Catalog | The catalogs of the dynamic connections with the full resource path, for example, /SampleReports/SampleReports.cat. |
| Data Source | The data source names of the dynamic connections in the catalog. |
| Connection Name | The dynamic connection names. You can select a connection name to edit the dynamic connection. |
| SID | The security identifiers (SID). SID can be a group, a role, or a user in the Report Server security system. |
| Organization Name | The organizations that the SIDs belong to. The column is available to system admin when Server enables the Organization feature. |
| Database User | The database usernames of the dynamic connections. Null means using the default database username. |
| Database password | The database passwords of the dynamic connections. Server masks the passwords. |
Managing Dynamic Connections
Administrators can perform the following tasks for the dynamic connections in the dynamic connection table:
Sorting the dynamic connections
You can sort dynamic connections by any column except for Database Password in the dynamic connection table. To sort the dynamic connections by a column, select on the column name.
Searching for a dynamic connection
First select a category from the Search drop-down list, then type the keyword in the text box and select the Search icon  to start the search. To return to the full list, clear the keyword.
You can select the following search categories:
- Catalog
Select to search for catalogs. - Connection Name
Select to search for connection names. - SID
Select to search for SIDs. - Database User
Select to search for database users.
For example, to find the dynamic connections that use the catalog SampleReprts.cat, you can select Catalog from the search category drop-down list and type sam as the keyword. Report will search for sam in the Catalog column and display the dynamic connections whose catalogs contain the text sam.
Editing a dynamic connection
Select the connection name to open the Edit Dynamic Connection dialog box, in which you can edit the properties of the dynamic connection as you want.
Deleting dynamic connections
Select the dynamic connections and then select Delete. To delete all the dynamic connections at a time, select the checkbox on the column header and select Delete.
Applying Dynamic Connections
When running a report or scheduling a task to run a report, if there are multiple dynamic connections available for the catalog of the report, you can select one of them to apply. Report Server then passes the changed connection properties of the selected dynamic connection into the Report Engine. The Report Engine will merge the changed properties with the other original catalog connection properties to set up the database connection.
When there are multiple dynamic connections:
- For direct run, link reports, API run, getting parameter values from the database, and getting filter values from the database, Server applies the first available dynamic connection automatically.
- For advanced run, you can select one of the dynamic connections.
- For schedule run, if Server cannot find the selected dynamic connection when running reports, then it applies the first available dynamic connection.
 Previous Topic
 Back to top