Format Category (X) Axis Dialog Box Properties
You can use the Format Category (X) Axis dialog box to format the category (X) axis of a chart (unavailable in pie or indicator charts). This topic describes the properties in the dialog box.
This topic contains the following sections:
- Axis Tab Properties
- Tick Mark Tab Properties
- Font Tab Properties
- Orientation Tab Properties
- Format Tab Properties
You see these elements on all the tabs:
OK
Select to apply any changes you made here and close the dialog box.
Cancel
Select to close the dialog box without saving any changes.
Help
Select to view information about the dialog box.
Axis Tab Properties
Specify general information of the category (X) axis of the chart.
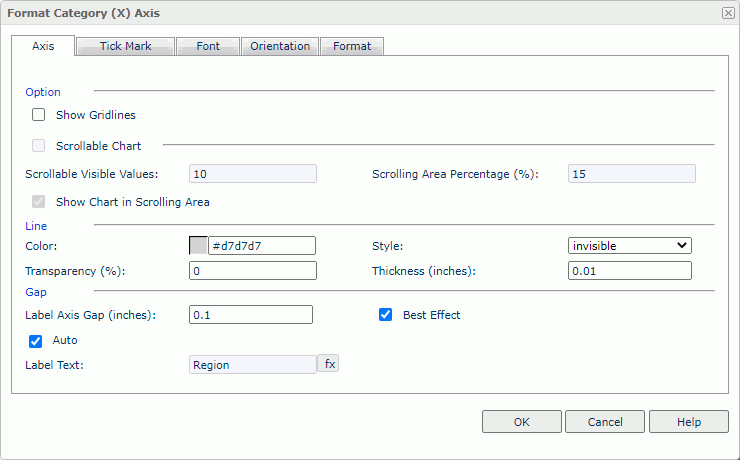
Option
Specify the properties of the axis.
- Minimum Value
Specify the minimum value to display on the axis. Available only to bubble chart or scatter chart. - Maximum Value
Specify the maximum value to display on the axis. Available only to bubble chart or scatter chart. - Increment
Specify the difference between two adjacent values on the axis. Available only to bubble chart or scatter chart. - Number of Tick Marks
Specify the number of tick marks to display on the axis. Available only to bubble chart or scatter chart. - Show Gridlines
Select to show the horizontal gridlines in the chart.
Scrollable Chart
Select to make the chart scrollable. Server will adds a scroll bar in the chart, with which you can control the visible value range on the axis. This property is available to 2D charts of bar, bench, line, area, and stock types.
- Scrollable Visible Values
Specify the number of data items you want to select on the scroll bar and display on the axis by default. - Scrolling Area Percentage
Specify the percentage the scroll bar occupies the whole size of the chart. - Show Chart in Scrolling Area
Select to show the thumbnail chart on the scroll bar.
Specify the line properties for the axis.
- Color
Specify the color of the axis. - Style
Select the style for the line of the axis. - Transparency
Specify the transparency for the color of the axis. - Thickness
Specify the thickness for the line of the axis, in inches.
Gap
Specify the gap properties for the labels on the axis.
- Label Axis Gap
Specify the distance between the label and the axis, in inches. - Best Effect
Select to adjust the labels automatically to place them in the best positions. - Auto
Select if you want the major tick mark labels on the axis to display the values of the field on the axis as the text. You can clear this property to customize the label text.- Label Text
Specify the text of the major tick mark labels on the axis. Type the text manually, or select the formula button and select a field from the list to use its values as the label text.
- Label Text
Tick Mark Tab Properties
The tab consists of three sub tabs:
Major Tick Mark
Specify the properties of the major tick marks on the axis.
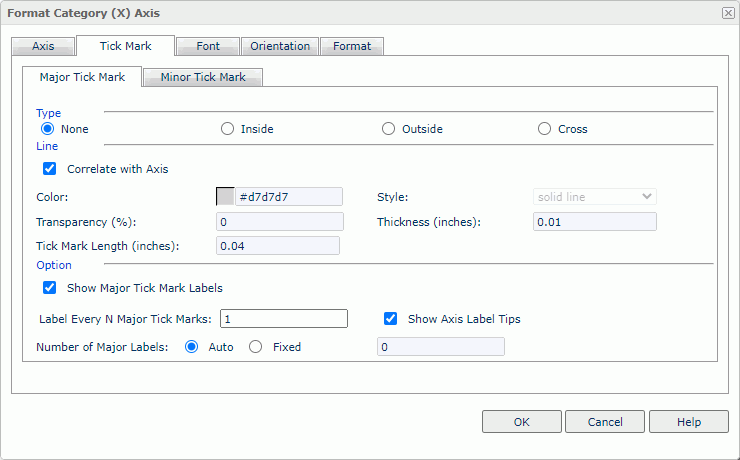
Specify the type of the major tick marks on the axis.
- None
Select if you don't want to display major tick marks on the axis. In this case, you needn't specify the other major tick mark related properties. - Inside
Select to display major tick marks inside the chart. - Outside
Select to display major tick marks outside the chart. - Cross
Select to display major tick marks across the axis.
Line
Specify the line properties of the major tick marks on the axis.
- Correlate with Axis
Select if you want the line properties of the major tick marks to correlate with that of the axis automatically. You can clear this property and customize the line properties.- Color
Specify the line color. - Style
Select the line type. - Transparency
Specify the transparency for the line color. - Thickness
Specify the line thickness in inches.
- Color
- Tick Mark Length
Specify the line length in inches.
Option
Specify the other properties of the major tick mark labels on the axis.
- Show Major Tick Mark Labels
Select to display the labels of the major tick marks on the axis and enable the following properties. - Label Every N Major Tick Marks
Specify the frequency at which you want to label the major tick marks. - Show Axis Label Tips
Select to display the complete label text when you hover over a label on the axis. - Number of Major Labels
Specify the number of major tick mark labels to display on the axis.- Auto
Select to display all major tick mark labels. - Fixed
Select to customize the number of the major tick mark labels to display on the axis.
- Auto
Minor Tick Mark
Specify the properties of the minor tick marks on the axis.
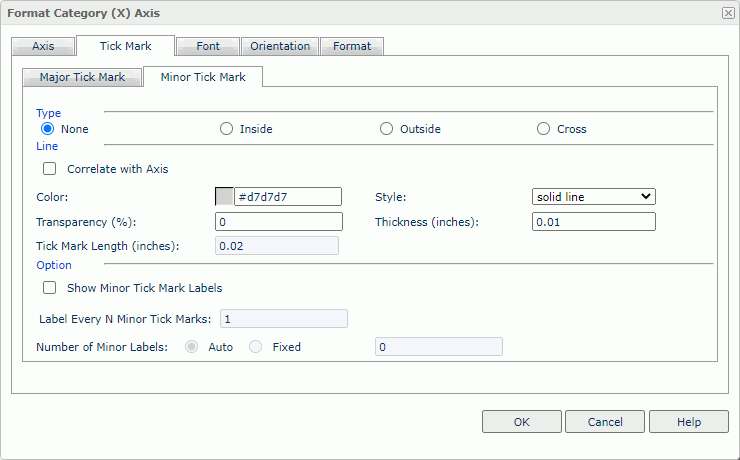
Specify the type of the minor tick marks on the axis.
- None
Select if you don't want to display minor tick marks on the axis. In this case, you needn't specify the other minor tick mark related properties. - Inside
Select to display minor tick marks inside the chart. - Outside
Select to display minor tick marks outside the chart. - Cross
Select to display minor tick marks across the axis.
Line
Specify the line properties for the minor tick marks on the axis.
- Correlate with Axis
Select if you want the line properties of the minor tick marks to correlate with that of the axis automatically. You can clear this property and customize the line properties.- Color
Specify the line color. - Style
Select the line type. - Transparency
Specify the transparency for the line color. - Thickness
Specify the line thickness in inches.
- Color
- Tick Mark Length
Specify the line length in inches.
Option
Specify the other properties of the minor tick marks on the axis.
- Show Minor Tick Mark Labels
Select to display the labels of the minor tick marks on the axis and customize the following two properties. The setting takes effect only when you select Use Constant Interval on the Scale tab under the Tick Mark tab. - Label Every N Minor Tick Marks
Specify the frequency at which you want to label the minor tick marks. - Number of Minor Labels
Specify the number of minor tick mark labels to display on the axis.- Auto
Select to display all minor tick mark labels. - Fixed
Select to customize the number of the minor tick mark labels to display on the axis.
- Auto
Scale
Customize the way in which you want to label the major and minor tick marks on the axis with constant interval. Server activates this tab only when the field on the category axis is one of the following types: Number, Date, DateTime, and Time (for a bubble chart only when the category field is one of the preceding types and the Bubble X-axis uses the category field), except for scatter charts.
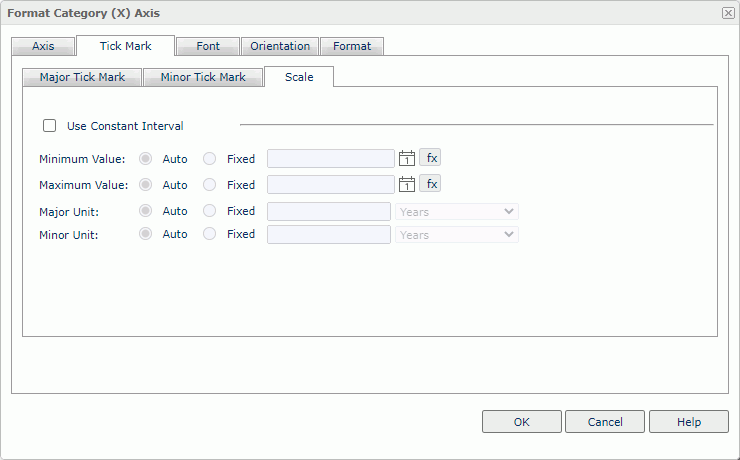
Use Constant Interval
Select to use a constant interval to label the tick marks. The values of the tick marks will increase continually on the axis based on the following properties, instead of just using the data values. Server will ignore the customized major tick mark labels on the Axis tab.
Minimum Value
Specify the minimum value to label the tick marks.
- Auto
Select if you want Report to define the minimum value automatically. - Fixed
Select if you want to define the minimum value. Type the value in the text box, or select the Calendar icon to specify it using the calendar if the field on the category axis is of Date, DateTime, or Time type.
Maximum Value
Specify the maximum value to label the tick marks.
- Auto
Select if you want Report to define the maximum value automatically. - Fixed
Select if you want to define the maximum value. Type the value in the text box, or select the Calendar icon to specify it using the calendar if the field on the category axis is of Date, DateTime, or Time type.
Major Unit
Specify the unit between two adjacent major tick marks.
- Auto
Select if you want Report to define the unit automatically. - Fixed
Select if you want to define the unit. Type the value in the text box, or choose one from the list if the field on the category axis is of Date, DateTime, or Time type.
Minor Unit
Specify the unit between two adjacent minor tick marks.
- Auto
Select if you want Report to decide the unit automatically. - Fixed
Select if you want to define the unit. Type the value in the text box, or choose one from the list if the field on the category axis is of Date, DateTime, or Time type.
Font Tab Properties
The tab consists of two sub tabs:
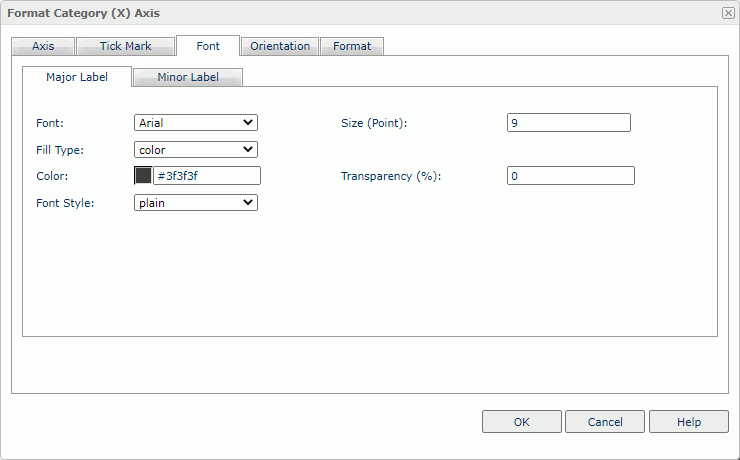
Major Label
Specify the font format of the major tick mark labels on the axis.
Font
Select the font face of the label text.
Size
Specify the font size of the label text.
Fill Type
Select the fill type of the label text: none, color, texture, or gradient.
Color
Specify the color of the label text. It takes effect when Fill Type on this tab is color.
Transparency
Specify the color transparency of the label text.
Font Style
Select the font style of the label text: plain, bold, italic, or bold italic.
Minor Label
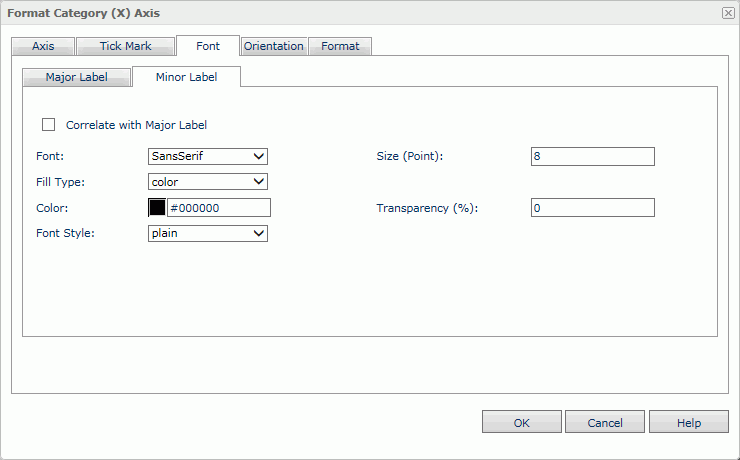
Specify the font format of the minor tick mark labels on the axis.
Correlate with Major Label
Select if you want the font format of the minor tick mark labels to correlate with that of the major tick mark labels automatically. Only when you clear this property can the font properties of the minor tick mark labels take effect.
Font
Select the font face of the label text.
Size
Specify the font size of the label text.
Fill Type
Select the fill type of the label text: none, color, texture, or gradient.
Color
Specify the color of the label text. It takes effect when Fill Type on this tab is color.
Transparency
Specify the color transparency of the label text.
Font Style
Select the font style of the label text: plain, bold, italic, or bold italic.
Orientation Tab Properties
The tab consists of two sub tabs:
Major Label
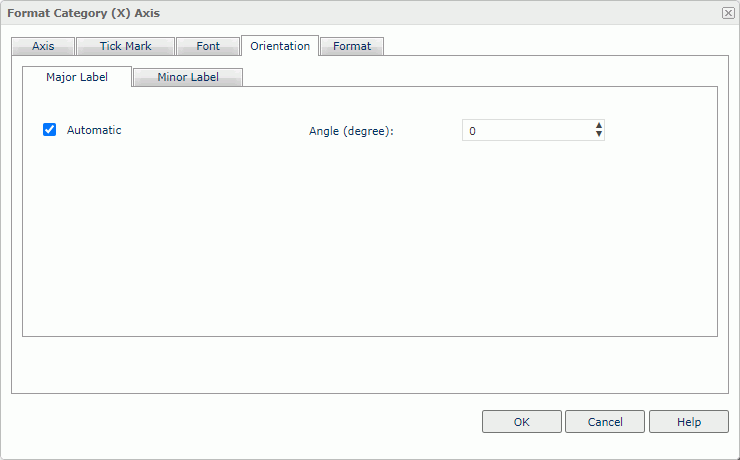
Specify the rotation angle of the major tick mark labels on the axis.
Automatic
Select to adjust the rotation angle of the major tick mark label text on the axis automatically according to the length of the label text, in degrees.
- If the text can completely display horizontally, the default rotation angle will be 0.
- If the text cannot completely display horizontally, the default rotation angle will be 30 anticlockwise. Server displays an ellipsis (…) from the right side of the label, along with part of the name instead of the entire name.
Angle
Specify the rotation angle of the major tick mark label text on the axis.
Minor Label
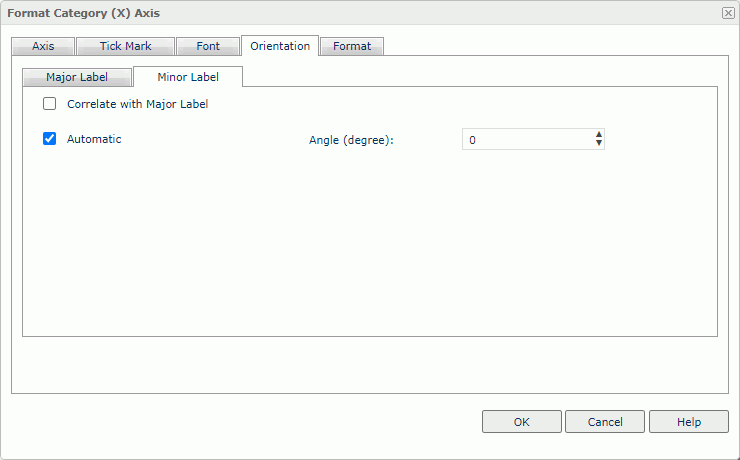
Specify the rotation angle of the minor tick mark labels on the axis.
Correlate with Major Label
Select if you want the orientation setting of the minor tick mark labels to correlate with that of the major tick mark labels automatically. Only when you clear this property can the orientation properties of the minor tick mark labels take effect.
Automatic
Select to adjust the rotation angle of the minor tick mark label text on the axis automatically according to the length of the label text, in degrees.
- If the text can completely display horizontally, the default rotation angle will be 0.
- If the text cannot completely display horizontally, the default rotation angle will be 30 anticlockwise. Server displays an ellipsis (…) from the right side of the label, along with part of the name instead of the entire name.
Angle
Specify the rotation angle of the minor tick mark label text on the axis.
Format Tab Properties
The tab consists of two sub tabs:
Major Label
Specify the data format of the major tick mark labels on the axis.
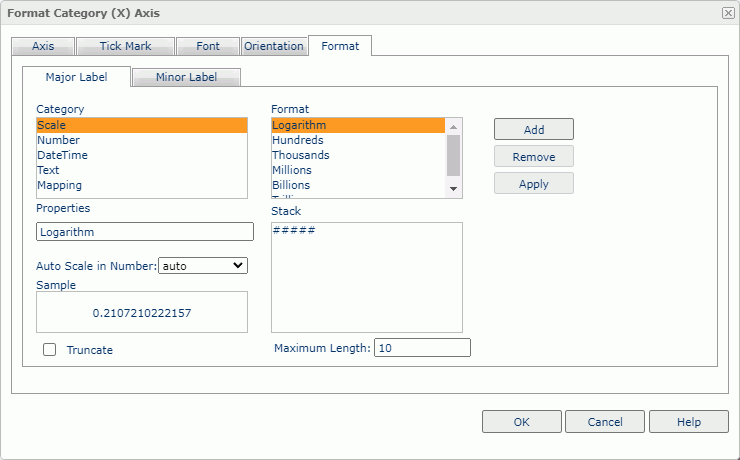
Truncate
Select to truncate the major tick mark labels when the label text contains more characters than the number you specify to the Maximum Length property below.
Maximum Length
Server enables this property when you enable Truncate. You can use it to specify the maximum number of characters the major tick mark labels on the axis can display. When a label contains more characters than the specified number and is truncated, Server displays an ellipsis (…) for the cut-off part, and the ellipsis takes three characters out of the maximum length. However, when you set the property value to less than 4, Server displays the specified number of characters in the label with no ellipsis.
For the other properties on this tab, see Format Tab Properties.
Minor Label
Specify the format of the minor tick mark labels on the axis.
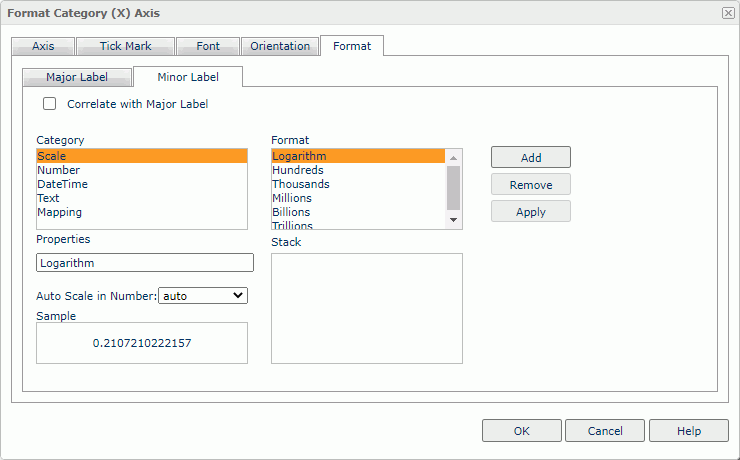
Correlate with Major Label
Select if you want the data format of the minor tick mark labels to correlate with that of the major tick mark labels automatically. Only when you clear this property can the format properties of the minor tick mark labels take effect.
For the other properties on this tab, see Format Tab Properties.
 Previous Topic
 Back to top