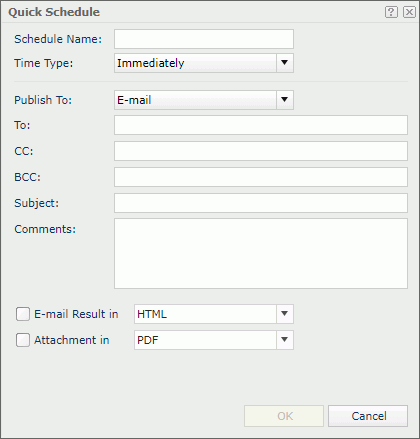
Quick Schedule Dialog Box Properties
You can use the Quick Schedule dialog box to specify the information for scheduling a report task based on the current page report tab in Page Report Studio. This topic describes the properties in the dialog box.

Schedule Name
Specify the name for the schedule task.
Time Type
Specify when you want to perform the task.
- Immediately
Select to run the task as soon as you select OK in the dialog box. - Periodically
Select if you want to specify the time for performing the task periodically.- Date
- Daily
Select to perform the task every day. - Weekly
Select to perform the task every week, and then select a day from the On list. - Monthly
Select to perform the task every month, and then select a day from the On list.
- Daily
- Time At
Specify the exact time.
- Date
Publish To
You can publish the report to one of the following locations:
- E-mail
Select to publish the report to email.- To
Specify the address you want to send the email to. - CC
Specify the address you want to copy the email to. - BCC
Specify the address you want to secretly copy the email to. - Subject
Specify the subject of the email. - Comments
Specify the contents of the email or comments to the contents. - E-mail Result in
Select to send the report in the mail body, and then select a format for the report.- HTML
Select to display the report in HTML in the mail body. Server ignores the contents in the Comments text box. - Text
Select to display the report in plain text in the mail body, with no other information such as color and images. Server positions the comments in front of the report.
- HTML
- Attachment in
Select to send the report as an attachment, and then select a format for the report. Page Report Result is an RSD file that you can view in Page Report Studio.
- To
- Version System
Select to publish the report to the server versioning system, and then select a format for the report. Report Result is an RST file, which you can export to HTML, PDF, Text, Excel, XML, RTF, and Postscript via Report Server. - FTP
Select to send the report to an FTP site.- Host Address
Specify the domain name or IP address of the FTP site. It cannot be null. - Port
Specify the port of the FTP server, optionally. By default, 21 is used for Standard FTP and Explicit FTPS, 22 for SCP and SFTP, and 990 for Implicit FTPS. - User Name
Specify the username valid to the authentication of the FTP server that can access the FTP site. If you don't provide a name, Server uses "anonymous" as the username by default. - Password
Specify the password valid to the authentication of the FTP server that enables the username to access the FTP site. - Account
Specify the account of the FTP user if it exists. - Folder Location
Specify the location where you want to put the report file on the FTP server. If you don't provide the location, Server uses the root path "/" of the FTP server by default. - Protocol Type
Select the protocol type for publishing the report to FTP. - Format
Select a format for the report.
- Host Address
OK
Select to apply any changes you made here and close the dialog box.
Cancel
Select to close the dialog box without saving any changes.
 Help button
Select to view information about the dialog box.
 Close button
Select to close the dialog box without saving any changes.
 Previous Topic
 Back to top