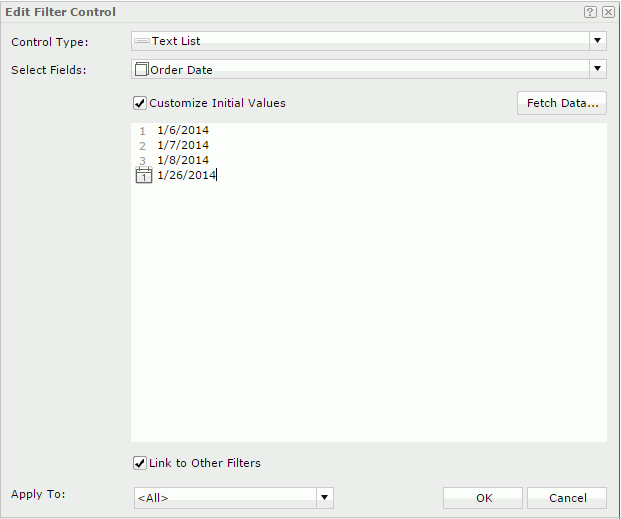
Edit Filter Control Dialog Box Properties
You can use the Edit Filter Control dialog box to edit a filter control. This topic describes the properties in the dialog box.
Server displays the dialog box when you right-click a filter control and then select Edit, or when you select the ellipsis button  beside the Filter On text box on the General tab of the Filter Control Properties dialog box.

Control Type
Select the type of the filter control.
Select Fields
Select the fields you want to bind to the filter control. All the selected fields should be of the same data type. You cannot bind uncomparable data type fields to a single filter control, such as Binary, Blob, Clob, Longvarchar, Longvarbinary, and Varbinary.
Customize Initial Values
By default, Server applies all the values of the selected fields in the filter control. Select Customize Initial Values if you want to customize the value list.
- Fetch Data
Select to open the Fetch Data dialog box to select values from the database and adds the selected values to the text box. - Text box
You can type values directly here. Make sure the accuracy of their formats and values.The value box is an editable multi-row plain text box. It supports general text editing operations such as copy, paste, cut, backspace, and delete. Press Enter to start a new row. Each row is a value of the user defined value list.
When you have selected Customize Initial Values but do not provide any values in the value box, Server will add all the values of the selected fields in the filter control.
-
 Calendar icon
Select to open the calendar to specify a Date/Time value.
Link to Other Filters
Clear if you don't want the filter control to be affected by other filter controls that apply to the same data components as the filter control.
Apply To
Select the components which you want the filter control to filter. <All> means all the data components involving the selected fields in the dashboard.
OK
Select to apply any changes you made here and close the dialog box.
Cancel
Select to close the dialog box without saving any changes.
 Help button
Select to view information about the dialog box.
 Close button
Select to close the dialog box without saving any changes.
 Previous Topic
 Back to top