 Previous Topic
Format Bar Dialog Box Properties
This topic describes how you can use the Format Bar dialog box to format the bars of a bar chart. Server displays the dialog box when you right-click a bar chart and select Format Graph from the shortcut menu.
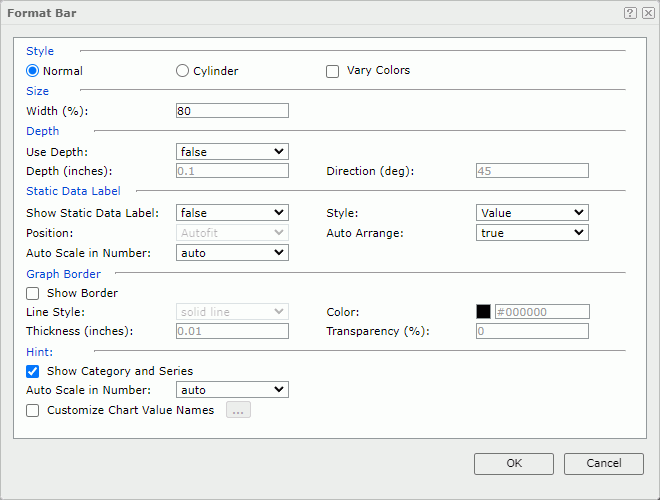
Style
Select the style of the bars in the chart.
- Normal
Select to make the bars be quadrate. - Cylinder
Select to make the bars be columned. It takes effect only when you select Use Depth in the dialog box. - Vary Colors
Select to make each bar of the chart take a different color schema. It takes effect for clustered bar/bench types when the chart has no series field.
Size
Specify the size of the bars in the chart.
- Width
Specify the bar width as a percentage of the unit width.
Depth
Specify the depth properties for the bars of the chart.
- Use Depth
Select true if you want to make the bars visually three-dimensional.- Depth
Specify the depth of the bars, in inches. - Depth Direction
Specify the angle of the axis along the depth of the bars, in degrees.
- Depth
Static Data Label
Specify the properties of the static data labels on the bars.
- Show Static Data Label
Select true if you want to show the static data labels on the bars. Only when it is true can the following static data label properties work. - Style
Select the display type for data values in the static data labels.- Value
Select to display the value for each bar. - Percent
Select to display the percentage of each bar to the total. - Value and Percent
Select to display the value and the percentage for each bar.
- Value
- Position
Select the position of the static data labels on the bars.
- Autofit
Select to display the static data labels automatically. - Outside Top
Select to display the static data labels on the outside top of the bars. - Inside Top
Select to display the static data labels on the inside top of the bars. - Inside Center
Select to display the static data labels at the inside center of the bars. - Inside Bottom
Select to display the static data labels at the inside bottom of the bars. - Auto Arrange
Server enables this property when you select Inside Center, Inside Top, or Inside Bottom as static data labels' position. Select true if you want to display the static data labels that can completely show inside the bars.- true
Server displays the static data labels horizontally at the specified position if the bars have enough space horizontally, otherwise displays them vertically. If a bar does not have enough space both vertically and horizontally, Server does not display its static data label. - false
Server displays the static data labels at the specified position. If data labels overlap, Server does not display some of them.
 For a bar chart created in Report Designer, Server disables the Auto Arrange option when you have rotated the data labels.
 - true
- Auto Scale in Number
Select true if you want to automatically scale the values that are of the Number data type when the values fall into the two ranges:- When 1000 <= value < 10^15, Report uses the following quantity unit symbols of the International System of Units to scale the values: K (10^3), M (10^6), G (10^9), and T (10^12).
- When 0 < value < 0.001 or value >= 10^15, Report uses scientific notation to scale the values.
The default value auto means that the setting follows that of the chart.
Graph Border
Specify the properties for the border of the bars.
- Show Border
Select to show the border and enable the border properties.- Line Style
Select the line style of the border. - Color
Specify the color of the border. - Thickness
Specify the thickness of the border. - Transparency
Specify the transparency for the border color.
- Line Style
Hint
Specify the properties of the data marker hint.
- Show Category and Series
Select to include the category and series values in the data marker hint.
- Auto Scale in Number
Select true if you want to automatically scale the values that are of the Number data type when the values fall into the two ranges:- When 1000 <= value < 10^15, Report uses the following quantity unit symbols of the International System of Units to scale the values: K (10^3), M (10^6), G (10^9), and T (10^12).
- When 0 < value < 0.001 or value >= 10^15, Report uses scientific notation to scale the values.
The default value auto means that the setting follows that of the chart.
- Customize Chart Value Names
Select if you want to customize the names of the fields used as the values in the chart. Server uses the customized names in the data marker hint. Then select the ellipsis button to open the Customize Chart Value Names dialog box.
OK
Select to apply any changes you made here and close the dialog box.
Cancel
Select to close the dialog box without saving any changes.
 Help button
Select to view information about the dialog box.
 Close button
Select to close the dialog box without saving any changes.
 Back to top