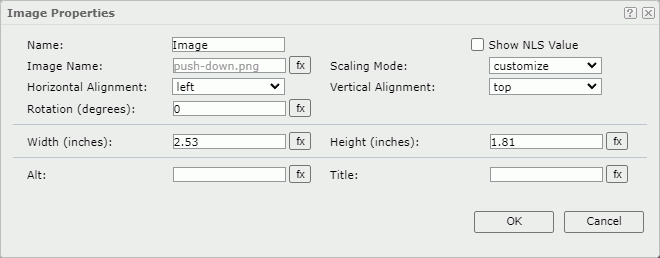
Image Properties
This topic describes how you can use the Image Properties dialog box to edit the properties of an image. Server displays the dialog box when you right-click an image and select Properties from the shortcut menu.

Name
Specify the display name of the image.
Show NLS Value
Select to show the translated name for the display name of the object in the Name text box if you have enabled the NLS feature and translated it, and when you have not modified the display name of the object.
Image Name
Specify the image file name.
 Formula button
When this button is available to a property, you can control the value of the property by a formula. Select this button, and then select a formula or select <Edit Expression> to create an expression using the Formula Editor.
Scaling Mode
- actual size
Select to show the image in its actual size. If the display area is smaller than the image, Server hides part of the image. - fit image
Select if you want the image to fill the display area and keep the original perspective ratio under the limitation of Max Ratio. - fit width
Select if you want the image to fit the display area width under the limitation of Max Ratio. - fit height
Select if you want the image to fit the display area height, under the limitation of Max Ratio. - customize
Select if you want to specify the width and height of the image in the size fields.
Horizontal Alignment
Specify the horizontal alignment of the image in its container.
Vertical Alignment
Specify the vertical alignment of the image in its container.
Rotation
Rotate the image at a specified angle in degrees. The following is the meaning of different values:
- 0 - No rotation.
- Positive value - Rotate the image clockwise.
- Negative value - Rotate the image anticlockwise.
![]() When you specify a rotation degree for the image, in the report the area for displaying the image retains its original size hence it may result in that the rotated image exceeds the area boundary. In this case, Report hides the parts that extend outside of the area.
When you specify a rotation degree for the image, in the report the area for displaying the image retains its original size hence it may result in that the rotated image exceeds the area boundary. In this case, Report hides the parts that extend outside of the area.
Width
Specify the width of the area for displaying the image.
Height
Specify the height of the area for displaying the image.
Alt
Specify the alternate text of the image, which will show when the image cannot display.
Title
Specify tip information about the image, which will show when you hover over the image.
OK
Select to apply any changes you made here and close the dialog box.
Cancel
Select to close the dialog box without saving any changes.
 Help button
Select to view information about the dialog box.
 Close button
Select to close the dialog box without saving any changes.
 Previous Topic
 Back to top