Select Field Dialog Box Properties
This topic describes how you can use the Select Field dialog box to select the fields that you want. The dialog box varies according to different sources that you opened it from.
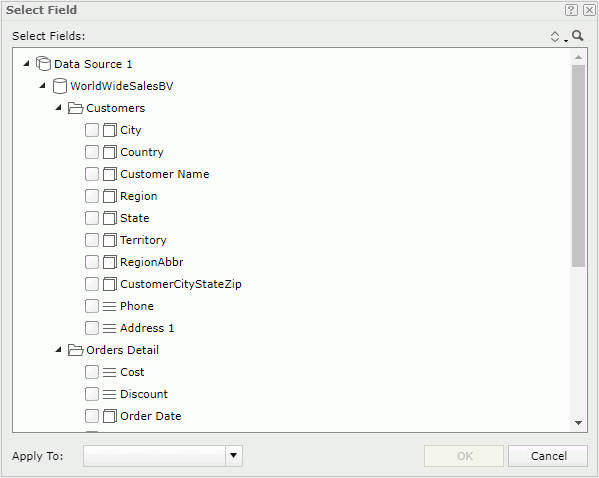
When you select the Add button + on the title bar of the Filter panel to open the Select Field dialog box, you see the following properties in the dialog box:

Select Fields
Select the fields of the same data type to add into the Filter panel. You cannot add incomparable data type fields to the Filter panel together, such as Binary, Blob, Clob, Longvarchar, Longvarbinary, and Varbinary.
 Sort button
Select an order for sorting the resources in the business view. The order applies to all the resource trees where you see the business view in Web Report Studio.
The order can be one of the following:
- Predefined Order
Select if you want to sort the resources in the order as in the Business View Editor of Designer. - Resource Types
Select if you want to sort the resources by the resource type. Namely, category objects come first, then group objects, then aggregation objects, and at last detail objects. - Alphabetical Order
Select if you want to sort the resources in alphabetical order. Report sorts the resources that are not in any category first, and then the categories. It also sorts the resources in each category alphabetically.
 Search button
Select to launch the search bar to search for view elements.
See the following properties in the search bar:

- Text box
Type the text you want to search in the text box. Server lists the values that contain the matched text.  Close button
Select to close the search bar.-
 More Options button
Select the button and Server displays more search options.- Highlight All
Select if you want to highlight all matched text. - Match Case
Select if you want to search for text that meets the case of the typed text. - Match Whole Word
Select if you want to search for text that looks the same as the typed text.
- Highlight All
-
 Previous button
Select to go to the previous matched text when you have selected Highlight All. -
 Next button
Select to go to the next matched text when you have selected Highlight All.
Apply To
Select the data components in the current report to which you want to apply the filter.
OK
Select to apply the fields you selected here.
Cancel
Select to close the dialog box without selecting any fields.
 Help button
Select to view information about the dialog box.
 Close button
Select to close the dialog box without selecting any fields.
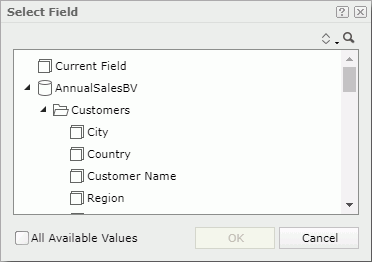
When you select Add Dynamic Field in the Insert Link dialog box or Edit Link dialog box when the link type is URL or E-mail, you see the following properties in the Select Field dialog box:

Resources box
Server lists all the elements in the current business view and dynamic resources in the current report. Select a field to insert it into the URL or email address to compose a dynamic hyperlink. You should make sure the field you select contains the information to compose a correct URL or email address.
- Current Field
Select to use the field that is related to the trigger object of the link to compose the URL or email address. - Current Category
Available to charts. Select to dynamically use the group field that displays on the category axis of the chart at runtime. - Current Series
Available to charts. Select to dynamically use the group field that displays on the series axis of the chart at runtime.
 Sort button
Select an order from the drop-down list with which you want to sort the view elements. The order applies to all the resource trees where you see the business view in Web Report Studio.
 Search button
Select to launch the search bar to search for view elements.
All Available Values
Select if you want to display in the URL all the runtime values of the field that you selected here, instead of only one value. You can select this property when you are linking an object in a chart, table, banded object, or crosstab (excluding its summaries) to URL, and when you did not select Current Field.
OK
Select to apply the field you selected here and close the dialog box.
Cancel
Select to close the dialog box without selecting a field.
 Help button
Select to view information about the dialog box.
 Close button
Select to close the dialog box without selecting a field.
 Previous Topic
 Back to top