Managing Server Data
During its running process, Report Server keeps track of server information and stores it to its own database to manage the resources on the server, monitor the task running status, and collect server running statistics. This topic describes how you can back up, archive, and restore server data, and clear invalid nodes and data.
The server database includes system, realm, and profiling. The system database holds the resources of the global server scope, such as server.properties and global NLS. The realm database holds the information of folders, nodes, versions, the security system, and the completed table. The profiling database holds server runtime related information. For more information, see Configuring Server Databases for Server Metadata.
You must be an administrator to access the Administration menu on the Server Console to perform the data management tasks.
This topic contains the following sections:
- Backing Up and Restoring Server Data
- Archiving and Restoring Server Data
- Viewing the Summary Information of Archive Files
- Clearing Invalid Nodes from the Server Database
- Checking Server Data Integrity
Backing Up and Restoring Server Data
The server data backup process inspects the tables in the database, collects and then exports all table data to a ZipEntry. For tables such as the catalog version table, report version table, and report result version table, the data also includes relational real files from the history directory. Server compresses the server data to a single Zip file and stores all table data and every relational real file as a ZipEntry in this single file.
The Backup and Restore features support cross-platform case, for example, you can back up the server data to a zip file on Windows and then restore it on Linux/UNIX.
You have two alternatives for backing up the server data: through the Server Console or through command line.
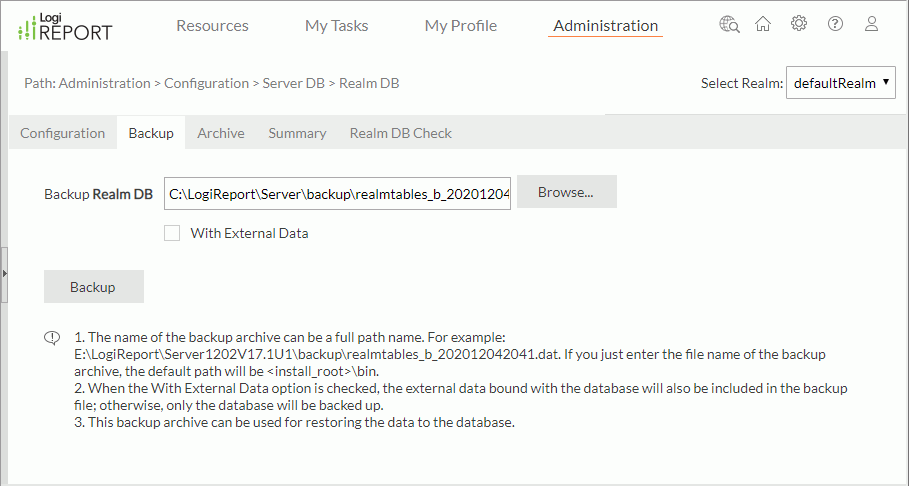
- Backing up the server data via the Server Console
- On the system toolbar of the Server Console, navigate to Administration > Configuration > Server DB > System DB/Realm DB/Profiling DB to open the corresponding page.
- Select the Backup tab.

- If you are backing up the realm or profiling database, select a realm from the Select Realm drop-down list at the upper-right corner.
- Type and select Browse to specify the file path and name of the backup file. You should include the file extension.
- If you are backing up the system database, With External Data is available. Select it if you want to archive the external data bound with the database that are the physical resources in the server resource tree at the same time.
- Select Backup to start the backup process. Server displays the status upon finishing.
- Backing up the server data by command line
You can use a tool to back up the server data. It is DBMaintain.bat/DBMaintain.sh in <
install_root>\bin. It has two parameters:- -Bsystemtables/-Brealmtables/-Bprofiling: Back up the data with the server data in a Server Cluster.
- -B0realmtables: Only back up the data in the database.
To back up the server data via the command line, take the following two steps:
- In a DOS window, switch to the
<install_root>\binfolder. - Use the DBMaintain command and -Bsystemtables/-Brealmtables/-Bprofiling or -B0realmtables parameter. For example:
C:\LogiReport\Server\bin>DBMaintain -Brealmtables:C:\TEMP\cmd_b_realmtables.dat -Bprofiling:C:\TEMP\cmd_b_profiling.dat
The server data restore process picks up all table data from the backup file and inserts it into the corresponding table in the database. You can only restore server data using the DBMaintain tool with the -Rsystemtables/-Rrealmtables/-Rprofiling or -R0realmtables parameter.
- In the DOS window, switch to the
<install_root>\binfolder. - Use the DBMaintain command and -Rsystemtables/-Rrealmtables/-Rprofiling or -R0realmtables parameter, for example:
C:\LogiReport\Server\bin>DBMaintain -Rrealmtables:C:\TEMP\cmd_b_realmtables.dat -Rprofiling:C:\TEMP\cmd_b_profiling.dat
![]()
- When running DBMaintain.bat/DBMaintain.sh, errors may occur if the backup zip file is too large, due to JVM limitation. You can try the -B0realmtables and -R0realmtables options to back up and restore data separately.
- When backing up server data in a Cluster environment, you should back up the data on every cluster node to make sure no files get lost on any node after you restore them. Also, you should back up the system DB and realm DB together. Since the external data cannot be backed up once just on one single cluster node, to avoid redundant data backup, you need to manually back up the external files on every cluster node after backing up the system DB and realm DB on any of the cluster nodes.
- When restoring server data in a Cluster environment, first shut down all the cluster nodes, and then restore the data on each cluster node.
Archiving and Restoring Server Data
Along with the running of the server, the sizes of the result version table (DB: realm) and TaskContext table (DB: profiling) grow larger. Server enables you to archive data to a single backup file and then automatically delete it from the database. You can then retrieve the data from the backup file later. However, you can only restore server data from an archive file that is created using the same server version.
You need to be an administrator to archive and restore server data in the realm and profiling databases.
To archive the server data:
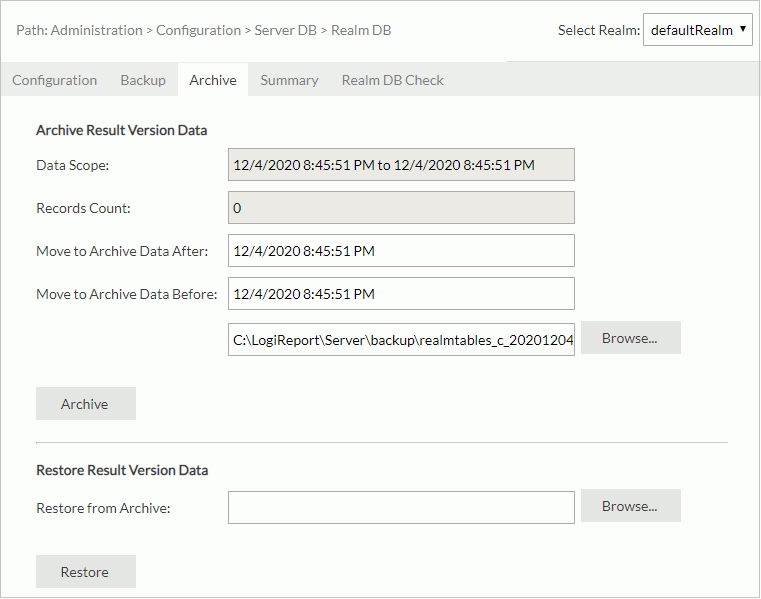
- On the system toolbar of the Server Console, navigate to Administration > Configuration > Server DB > Realm DB/Profiling DB.
- Server displays the Realm DB/Profiling DB page. Select Archive.

- Select a realm from the Select Realm drop-down list at the upper-right corner.
- In the Archive section, the Data Scope text box displays the result version data range and Records Count shows the number of sets of result version data in the database.
- Specify the range of data you want to archive. The range is defined using date time.
For Realm DB, in the Move to Archive Data After and/or Move to Archive Data Before text boxes, specify the date time accordingly (you should provide at least one date time). Server will then archive the data that Server generated between the specified time range or after/before the specified date time.
For Profiling DB, specify the date time in the Move to Archive Data Before text box to let Server archive the data before the date time.
- Type or select Browse to specify the file path and name for the archive file.
If you do not want to back up the archived server data, leave this field blank. Server will remove the server data from the database.
- Select Archive. Server archives the server data within the specified period, saves it to the archive file using the provided name, and deletes the same data from the database.
To restore the archived server data:
- On the system toolbar of the Server Console, navigate to Administration > Configuration > Server DB > Realm DB/Profiling DB. Server displays the Realm DB/Profiling DB page.
- Select Archive.
- Select a realm from the Select Realm drop-down list.
- In the Restore section, type or select Browse to provide the archive file name and location in the Restore from Archive text box.
- Select Restore to restore the specified data.
Viewing the Summary Information of Archive Files
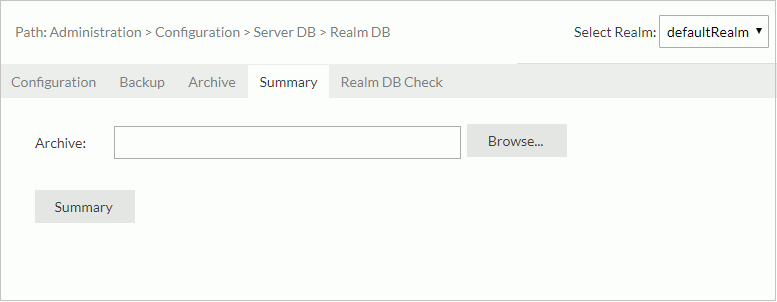
After archiving or backing up the realm and profiling databases, you can view the results. The summary information includes Archive, Date, Type, Version, Realm, Database, and Scope.
- On the system toolbar of the Server Console, navigate to Administration > Configuration > Server DB > Realm DB/Profiling DB. Server displays the Realm DB/Profiling DB page.
- Select Summary.

- Select a realm from the Select Realm drop-down list at the upper-right corner.
- In the Archive text box, type or select Browse to specify the data file from which you want to retrieve summary information.
- Select Summary. Server begins the summary process and returns summary information about the specified file.
Clearing Invalid Nodes from the Server Database
When you have published resources, such as folders, catalogs, and reports, using a real path, there is a possibility to produce invalid nodes. Also, after running a report and saving the result to the versioning system or scheduling reports in the versioning system, either of the following operations will generate invalid nodes:
- Cancel or change the real path setting.
- Publish a resource to replace an existing real path resource.
Server generates the invalid nodes in the realm database. They are links to files in the history folder that no longer exist. To clear them:
- On the system toolbar of the Server Console, navigate to Administration > Configuration > Server DB > Realm DB. Server displays the Realm DB page.
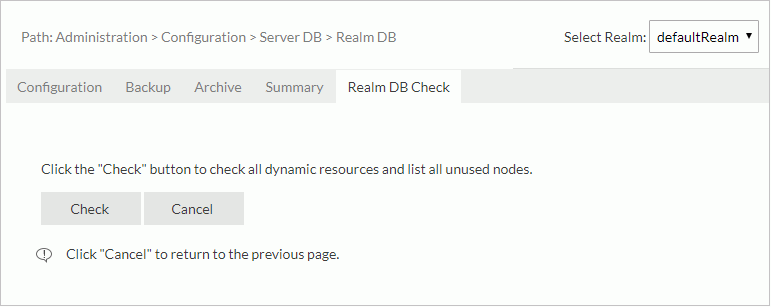
- Select the Realm DB Check tab.

- Select a realm from the Select Realm drop-down list at the upper-right corner.
- Select Check. Server lists the invalid resource nodes.
-
Select the invalid resource nodes you want to delete. To select all the resource nodes, select the checkbox on the top.
- Select Delete to delete the selected nodes.
Checking Server Data Integrity
In abnormal circumstances, Server may not save data correctly or completely in the database. You can check the integrity of server data.
The integrity check mainly examines two aspects of the realm database:
- Integrity and consistency among tables. This is to see whether the records among the tables are complete and consistent.
- Integrity and consistency between realm database and the external files. This is to see whether the records in the tables match the related external files.
If it finds any inconsistent or incomplete server data, Server removes it from the realm database. The same process will also apply to files.
To check server data integrity, do one of the following:
- Launch Server on the command line with the -cleanup parameter. For example:
C:\LogiReport\Server\bin>JRServer -cleanup - Open the batch file JRServer.bat in
<install_root>\bin, add the parameter -Dcheck.realmtables=true as follows, then start Server with the edited batch file."%JAVAHOME%\bin\java.exe" @"%REPORTHOME%\bin\java.option" -Dcheck.realmtables=true -Dinstall.root="%REPORTHOME%"...
 Previous Topic
 Back to top