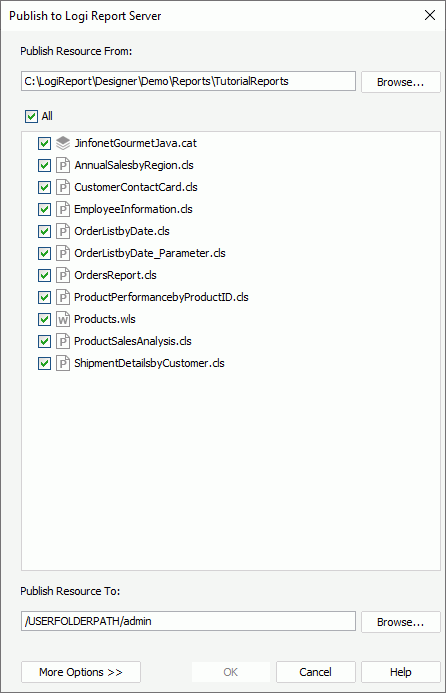
Publish to Report Server Dialog Box
You can use the Publish to Report Server dialog box to publish resources from Designer to a started Server. This topic describes the options in the dialog box.
Designer displays the Publish to Report Server dialog box when you do one of the following:
- Navigate to File > Publish > Publish Report to Server.
- Navigate to File > Publish > Publish Component to Server.
- Navigate to File > Publish > Publish Report to Server/Publish Component to Server, specify the connection and user information in the Connect to Report Server dialog box and select Connect if Designer cannot automatically connect to a started Server.

Designer displays these options:
Publish Resource From
Specify the directory in which the resources you want to publish are saved. By default, Designer displays the path of the currently opened catalog in the text box. You can select Browse to find another directory.
All
Select to publish all the resources in the specified directory.
Resource box
This box lists all the resources in the specified directory. Select the checkboxes ahead of the resources you want to publish.
Publish Resource To
Specify the file path on Server to which to publish the resources. Select Browse to select the path in the Select Folder dialog box.
More Options/Less Options
Select to show or hide the resource options. Select a to-be-published resource in the resource box and set its properties in the following tabs:
- Properties tab
Use this tab to specify properties of the selected resource.- Resource Node Name
Specify the name of the selected resource. This name is required and is used as the display name of the resource in the resource tree of Server. Select Browse to get the names of all the same type resource stored in the path to which you specify to publish the resources on Server, and select one of them as the name of the selected resource. - Resource Description
Specify the description to describe the selected resource. - Status
Designer enables this option when you select a report in the resource box. You can select the status of the report from the following:- Active
Select it and users can run, advanced run, and schedule the report on Server. - Inactive
Select it and users are not able to run, advanced run, or schedule the report on Server. - Incomplete
Select it if the report is not completely designed, then users are not able to run, advanced run, or schedule it on Server.
- Active
- Resource Real Path
Designer enables this option when you select a folder in the resource box. You can use it to specify the real path of the folder.- Enable Resources from Real Paths
Select to enable getting resources from the folder's real path.
- Enable Resources from Real Paths
- Custom Field
You can specify values of the custom fields for the selected resource if there are custom fields enabled on Server in this panel.- Name
This column shows the names of the custom fields. - Value
This column shows the values that you specify for the custom fields.
- Name
- Apply Archive Policy
Select to apply an archive policy to the selected resource.- Archive as New Version
Select to use multiple versions for the selected resource.- Max Number of Versions
Specify the maximum number of versions that Server maintains in the version table of the selected resource. The default value is 0, which means that the version amount is unlimited.
- Max Number of Versions
- Replace Old Version
Select to replace the old version when a new version is generated.
- Archive as New Version
- Resource Node Name
- Permissions tab
Designer enables this tab when you specify to publish the resources to a public folder on Server. You can use it to specify user permissions to the selected resource.- Enable Setting Permissions
Select to apply user permissions to the selected resource. - Role/User/Group tab
These tabs list the roles, users, and groups in the security system of Server. You can apply permissions to them by selecting a role/user/group and then selecting the checkboxes before the required permissions.- Add
Select to add roles/users/groups to assign permissions to them. - Remove
Select to remove the specified role/user/group from the Role/User/Group tab.
- Add
- Enable Setting Permissions
- Connection tab
Designer enables this tab when you select a catalog in the resource box. You can use it to view and modify properties of the data source connections in the catalog.- Catalog Data Source
Select the data source in the catalog. - Connection
Select the connection in the specified data source. - Modify
Designer enables this button if the selected connection is a JDBC connection. You can select it to modify the information of the connection in the Get JDBC Connection Information dialog box. - Name
This column shows properties of the selected connection. - Property
This column shows the values of the properties.
- Catalog Data Source
OK
Select to save the changes and publish the specified resources to Server.
Cancel
Select to close the dialog box without saving any changes.
Help
Select to view information about the dialog box.
 Previous Topic
 Back to top