Save As Dialog Box Properties
This topic describes how you can use the Save As dialog box to save the current web report or the web report page template, or save a data component in the current web report as a library component. The dialog box varies for different purposes.
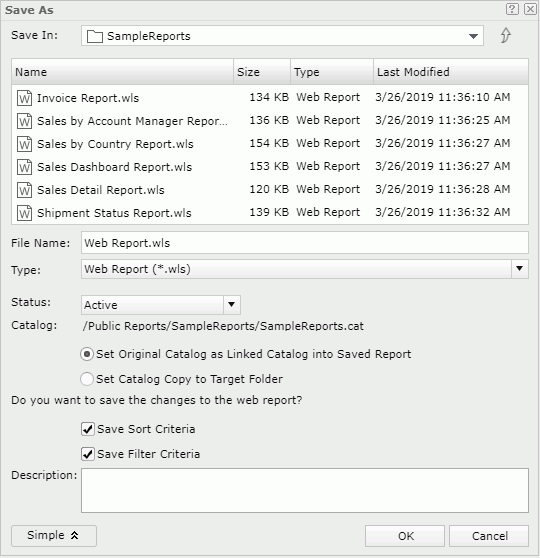
To use the Save As dialog box to save the current web report, select Menu > File > Save As, select the Save As button  on the toolbar, or select Save in the Web Report Wizard. Server displays the dialog box:

Save In
Specify the folder in the server resource tree where you want to save the report. Use the arrow button  to go to the parent folder. The root folder cannot store resources.
The resource table shows the resources in the selected folder. You can select the column names to change the order of the resources in the table.
- Name
The resource names. - Size
The size of the resources. - Type
The resource types. - Last Modified
The last modified time of the resources.
File Name
Specify the name for the report.
Type
Select a file type for the saved report.
- Web Report (*.wls)
Select to save the web report as a binary formatting file, which you can edit using Web Report Studio and Report Designer. - Web Report XML Format (*.wls.xml)
Select to save the web report as an XML formatting file, which you can edit using external XML editors besides Web Report Studio and Report Designer. Using XML is better for checking into source code control systems than using the binary formats.
Advanced/Simple
Select to display or hide the advanced settings.
- Status
Specify the status of the report.- Active
Select if you want to run, advanced run, and schedule to run the report. - Inactive
Select if you don't want to run the report. The corresponding Run, Advanced Run, and Schedule commands for the report are not available. - Incomplete
Select if you have not finished the report design and you don't want to run the report. The corresponding Run, Advanced Run, and Schedule commands for the report are not available.
- Active
- Catalog
Specify the catalog that you want the report to use.- Set Original Catalog as Linked Catalog into Saved Report
Select if you want to link the saved report with the catalog. The saved report will run with the catalog even if the two are in different folders. If later you update the catalog, the saved report will run with the latest version of the catalog. - Set Catalog Copy to Target Folder
Select if you want to copy the catalog to the folder where you save the report. The saved report will run with the copied catalog.
- Set Original Catalog as Linked Catalog into Saved Report
- Save Sort Criteria
Select to save the changes you made by sorting. - Save Filter Criteria
Select to save the changes you made by filtering. - Description
Provide a description for the saved report.
OK
Select to save the report with the specified settings and close the dialog box.
Cancel
Select to close the dialog box without saving the report.
 Help button
Select to view information about the dialog box.
 Close button
Select to close the dialog box without saving the report.
If you are an administrator with the privilege of publishing resources, you are able to see Web Report Template in the Type list of the Save As dialog box. By selecting Web Report Template, you can save the page template the web report uses.
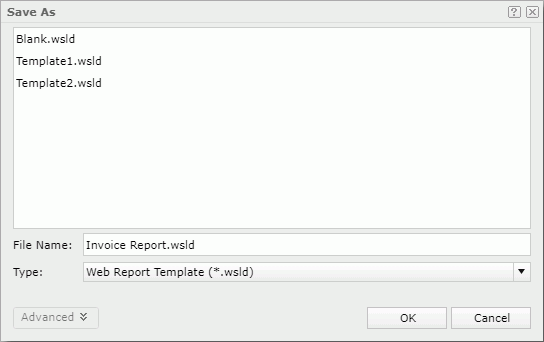
When you use the Save As dialog box to save a web report page template, it looks like this:

Template box
Server lists the existing web report page templates.
File Name
Specify the name of the web report page template. You can type the name to save it as a new template (.wsld) or select one from the template box to replace an existing template according to the Publish privilege, which is the system level authorization.
Type
Select Web Report Template from the list. You can see it when you are an administrator with the privilege of publishing resources.
OK
Select to save the web report page template with the specified settings and close the dialog box.
Cancel
Select to close the dialog box without saving the web report page template.
 Help button
Select to view information about the dialog box.
 Close button
Select to close the dialog box without saving the web report page template.
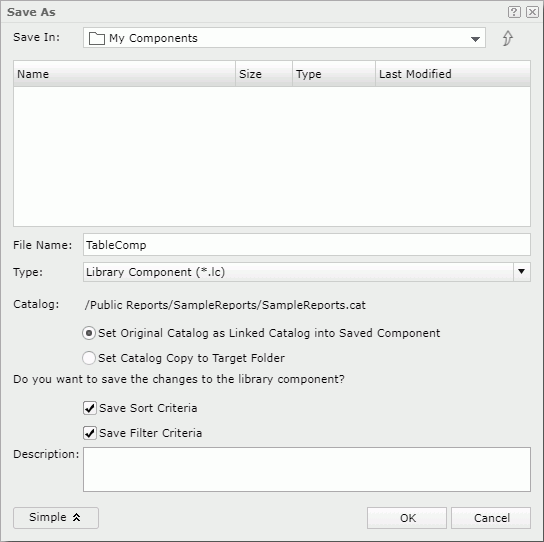
To use the dialog box to save a data component in a web report as a library component, right-click a table, crosstab, chart, KPI, or geographic map and select Save as Library Component. Server displays the dialog box:

Save In
Select the folder in the server resource tree where you want to save the library component. Use the arrow button  to go to the parent folder. The root folder cannot store resources.
The resource table shows the resources in the selected folder. You can select the column names to change the order of the resources in the table.
- Name
The resource names. - Size
The size of the resources. - Type
The resource types. - Last Modified
The last modified time of the resources.
File Name
Specify the name for the library component.
Type
It is Library Component by default which you cannot change.
Advanced/Simple
Select to display or hide the advanced settings.
- Catalog
Specify the catalog that the library component uses.- Set Original Catalog as Linked Catalog into Saved Component
Select if you want to link the library component with the catalog. The library component will run with the catalog even if the two are in different folders. If later you update the catalog, the library component will run with the latest version of the catalog. - Set Catalog Copy to Target Folder
Select if you want to copy the catalog to the folder where you save the library component. The library component will run with the copied catalog.
- Set Original Catalog as Linked Catalog into Saved Component
- Save Sort Criteria
Select to save the changes you made by sorting. - Save Filter Criteria
Select to save the changes you made by filtering. - Description
Provide a description for the library component.
OK
Select to save the library component with the specified settings and close the dialog box.
Cancel
Select to close the dialog box without saving the library component.
 Help button
Select to view information about the dialog box.
 Close button
Select to close the dialog box without saving the library component.
 Previous Topic
 Back to top